Introduction
You have a network of servers spread across AWS, and now you’re looking to integrate with some external services. But there’s a catch – these services require your app’s static IPs for whitelisting purposes. Our app, though, doesn’t play by the rules; it scales up or down with the mood. How in the tech world do we keep those static IPs while everything’s changing? So, what’s the solution? Enter our hero – NAT Gateway of AWS. It’s designed to help you navigate this situation smoothly. We’ll dive into how NAT Gateway can provide a stable and consistent connection for your app, ensuring seamless integration with those external services. Let’s get started and see how you can make this work efficiently.


Will Load Balancers come to the Rescue? Not Quite
Load balancers are primarily utilized for managing incoming traffic to applications, rather than dealing with outbound traffic. They offer a single IP or URL that allows multiple servers to operate behind it. Incoming traffic is first received by the load balancer, which then directs it to the appropriate servers. While they are capable of handling outbound traffic in certain scenarios, particularly within internal networks, they are not the best option for managing outbound traffic in complex, distributed systems. In such environments, other solutions are more suitable for effectively handling outbound communication needs.
This is where tools like NAT (Network Address Translation) Gateways come into play. They’re specifically designed for managing outbound connections from multiple servers within a private network. This is vital for communicating with external services or accessing the internet, especially when these external entities require a known, static IP address for reasons like security or whitelisting.
NAT Gateways: Your Dynamic Sidekick
NAT (Network Address Translation) Gateways offer several features that are beneficial for network management, especially in environments where multiple devices or systems need to access the internet or external networks. Here are some of the key features of using NAT Gateways:
- IP Address Consolidation: NAT Gateways allow multiple devices on a private network to connect to external networks or the internet using a single public IP address. This is particularly useful for conserving public IP addresses, which are limited resources.
- Security Enhancement: By masking the internal IP addresses of devices on a private network, NAT Gateways add a layer of security. External entities can only see the public IP address provided by the NAT Gateway, not the individual IP addresses of each device on the network.
- Ease of Configuration and Maintenance: Compared to some other network solutions, NAT Gateways are relatively straightforward to set up and maintain, particularly in cloud environments like AWS, where they can be configured with just a few clicks.
- Scalability: NAT Gateways are scalable, meaning they can handle varying amounts of traffic as the demand changes. This is particularly important in dynamic environments where network traffic can fluctuate.
- Cost-Effective: In certain scenarios, using a NAT Gateway can be more cost-effective than assigning public IP addresses to each device or server, especially in large networks.
You can learn more about NAT Gateways from this AWS article.
Setting Up NAT Gateway for that Cool Static Outbound Vibe
Enough of theory, now let’s see how to set up a NAT Gateway in AWS and run your application using it.
- Login to your AWS account. Select your preferred region from the top right.
- Goto VPC. And create a VPC with VPC and more features.
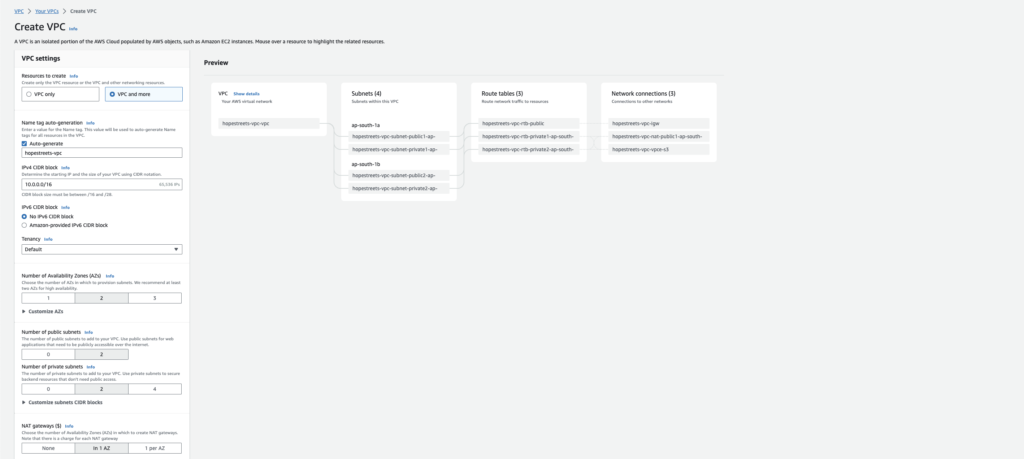
- Create your VPC with the following configuration:
- Give your VPC a name.
- Select the number of Availability Zones(AZ). Use at least two AZs for high availability.
- Select the number of public and private subnets. Resources inside the public subnet will be accessible publicly over the internet. Whereas private subnets are not publicly accessible. We will use 2 of each and in the next steps, we will deploy our app inside using the above-created private subnet.
- Select Create NAT gateway in 1 AZ.
- Rest keep everything as it is.
- Press Create VPC.
Our configuration and VPC map will look like:
In the configuration described above, you will notice the creation of two public subnets connected to an internet gateway. This connection makes them accessible over the internet. We connect our private subnets to a NAT gateway, providing us with a static IP.
When you visit the Elastic IP’s dashboard, you will find a new IP created and associated with our NAT gateway. This IP becomes our final static IP, masking all requests originating from our app servers.

Test our NAT Gateway Setup
Let’s create a EC2 instance and see this in action.
- Goto the EC2 console and launch a new instance. Use our above-created VPC and one of our private subnets.
Now that you have launched your EC2 instance inside a private subnet, you’ll notice it doesn’t have a public IP. This means you can’t SSH into it directly due to the lack of a public IP. However, you can still SSH into your instance by following this article: SSH into Private EC2 Instance
Once you are able to SSH, run the following curl command to display your external IP, which will be the IP of the NAT Gateway.
curl http://httpbin.org/ipConclusion
So, NAT Gateway is your new bestie for a static outbound IP. Wave goodbye to the stress of keeping up with external demands while your servers do the cha-cha. With this guide, you’re armed to tackle the challenges of hooking up external services to your wild, dynamic app. Cheers to chill vibes and smooth navigation! 🚀✨
Want to know how to ssh into a private EC2 instance? Read here